Duncan has submitted a Viewer Project that is a very cool idea! It’s a great way to conserve space, while avoiding the standard “wimpy workbench” problems most designs like this suffer from. Let’s check it out:
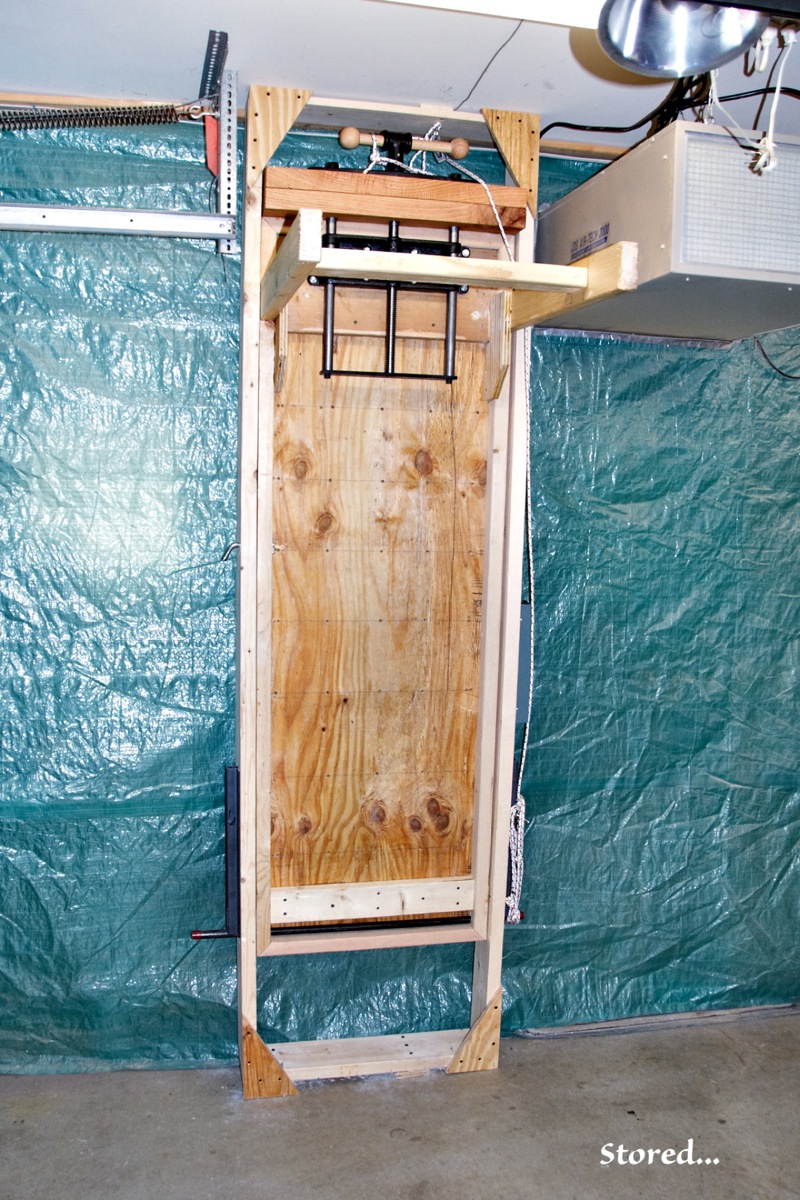
Half of my two-car garage is available for woodworking, with that space ?shared? either by a car or F450 pickup when one is pulled in for servicing. A sheet of plywood on sawhorses just wasn?t tolerable any longer. Taking a clue from a long-ago city apartment, I built a ?Murphy bench? with end vise, which stores vertically in an open box frame and pivots down for use. Not counting the end vise, the materials were less than $100 and the project only ate one weekend.
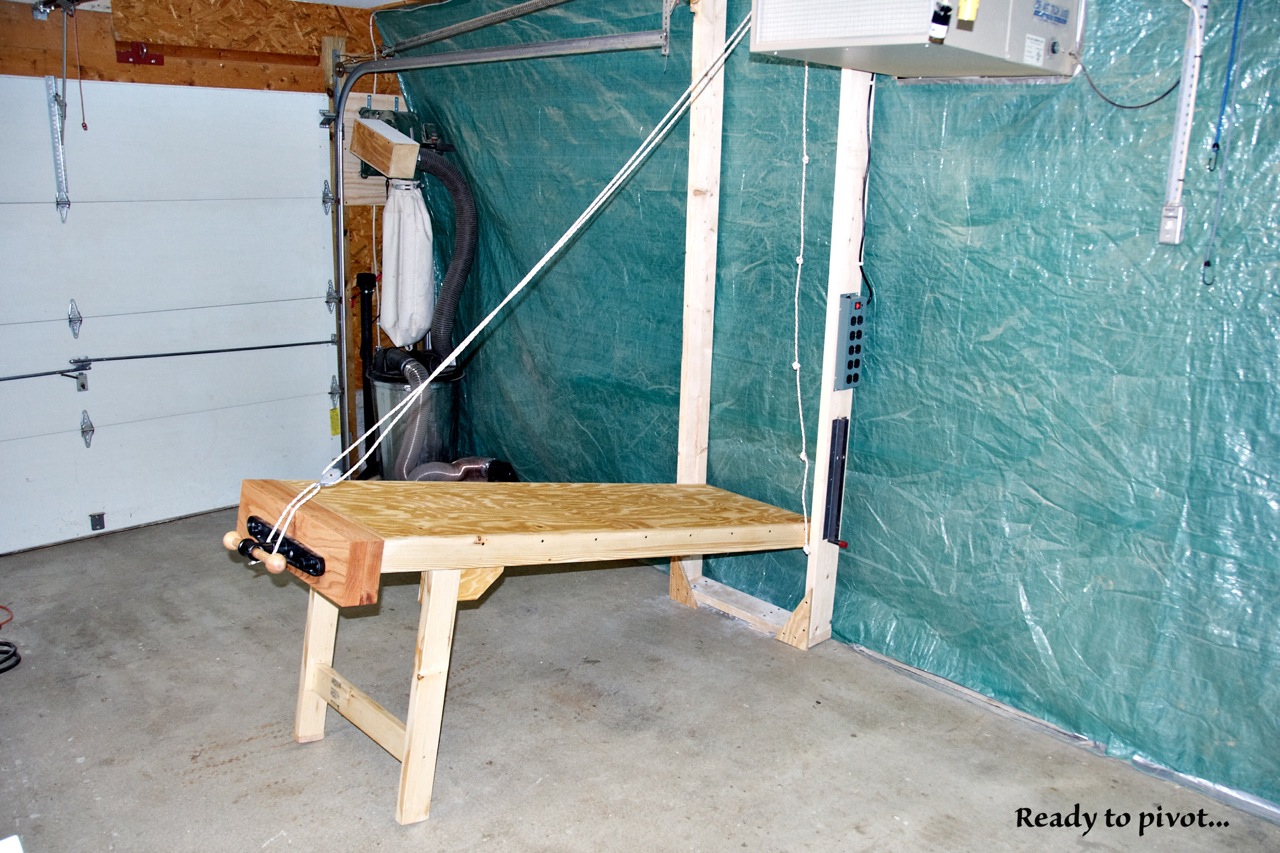
The top is a 4×8 ft sheet of 3/4 inch plywood siding ripped in half lengthwise, strips glued together with a ?good? side up, trimmed to remove tongue and groove, then rabbeted into a 2×4 frame. Corners are mitered, doweled, screwed, and glued for strength and some semblance of workman-like appearance. Finished top dimensions are 25 x 74 inches. Since the top had to pivot and store fully within in a frame of 2×6 stock, an end vise was the only practical choice. The largest possible was a Rockler 12 inch quick-release model. I made 6 x 25 inch jaws from a remnant of 2 inch oak. The jaws got a wiped-on Maloof-style oil finish; the bench top just a coat of clear shellac for some minimal dirt protection. While the top was sanded for cleanup of lumberyard footprints before shellacking, the final fir plywood finish is still sufficiently ?fuzzy? that objects don?t slip around unless there’s lots of sawdust. The front bench legs are 2×4 stock fixed in position. All joints are doweled, screwed and glued and their attachment to the top is reinforced with plywood scraps. The bracing is needed not only for normal use but because the legs skid a couple of inches across the concrete in a rocking motion as the far end of the bench is raised and lowered. Ready for use, the top is 32 inches above the floor, which for my height is a fair compromise for cabinet assembly and general tool use.
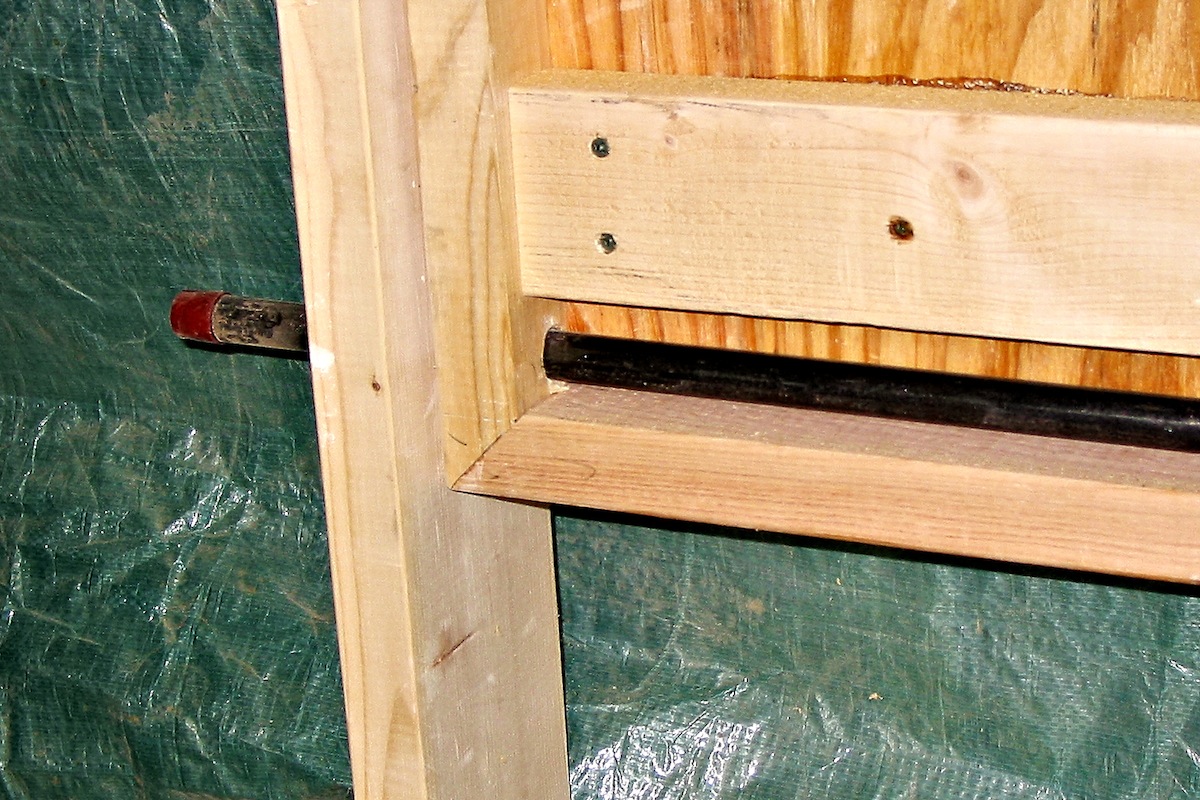
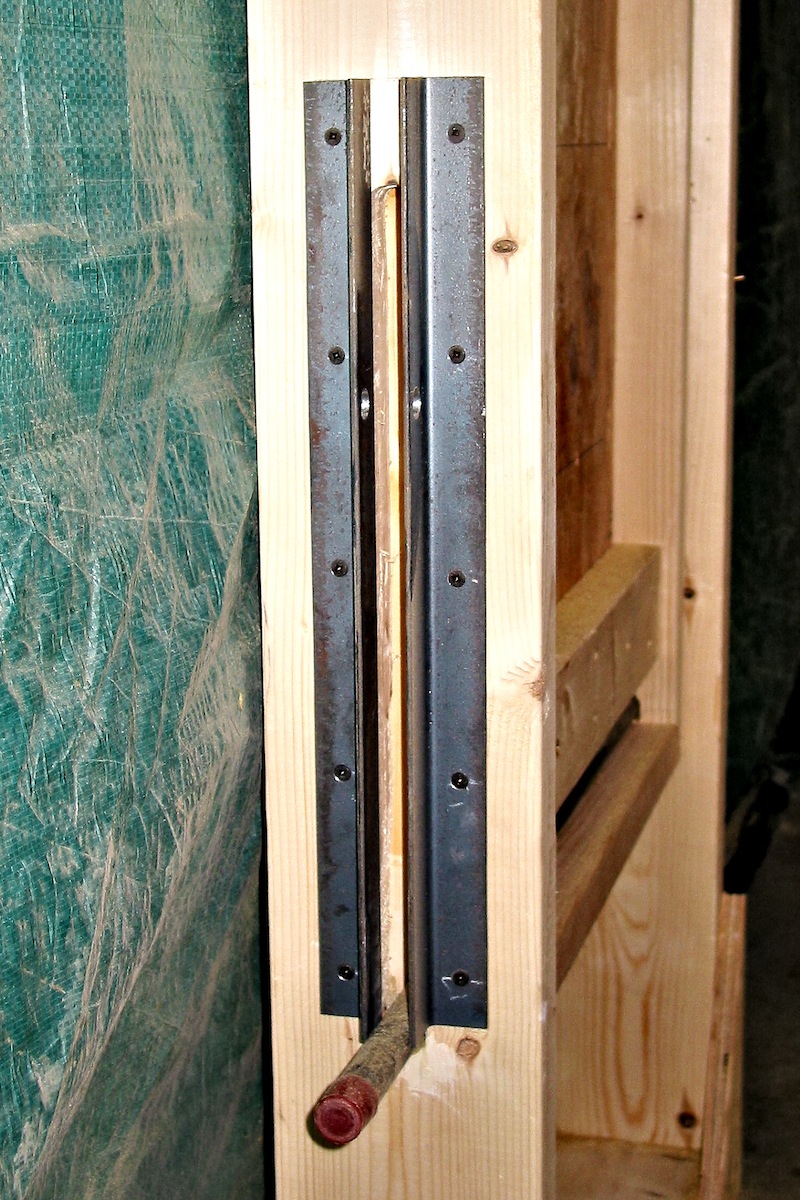
The storage frame, roughly 28 x 100 inches externally, is anchored to the garage floor with heavy Tapcon cement screws in holes drilled all the way through the pad to avoid bottoming. The top is screwed to the ceiling joists. Joints are screwed and reinforced with plywood. Since the finished ceiling height was another constraint, the frame end of the bench needed to ride in vertical slots so it could be lowered and the bench pivoted up into storage position while clearing shop lights and garage door opener. Slots were sized for a 36 inch length of 3/4 inch black iron pipe used as an axle. The pipe goes through the sides of the bench top at the end, centered on the 2×4 edge dimension and just clearing the inside of the frame end. The length allows use as a handle on each side to help raise the bench. Slot construction was basic– a series of 7/8 inch holes in line on center of the 2×6, roughed out via Sawzall and cleaned up with a router and pattern bit using tacked-on strips of scrap plywood as a guide. Two 18 inch lengths of 1 1/4 steel angle iron edge and reinforce each slot, constraining the pipe to minimize any bench hang-ups (in spite of wobbles or bobbles in the slots) while raising and lowering. The steel also allows use of 1/2 inch trailer hitch pins in match-drilled holes to hold the bench end in the fully raised position. One of the pins is also used to secure the bench safely in the stored position via a hole drilled through frame and edge of bench at a convenient height. Slot length was determined by ceiling height, bench length, leg position as dictated by end vise clearance, and need for 80 inches under the ends of the legs to clear a big pickup truck cab.
Since adequate mass is a key feature of a good bench and I?m a certified gray-haired geezer, a 2:1 ratio block and tackle (easily changed to 5:1 with just new pulleys) can be looped over the vise handle and ensures that I can raise and lower the bench easily. A power strip switched with shop lights is mounted on one side of the frame. The usual holes will be drilled in the top for bench dogs or other form of surface clamp as upcoming projects dictate. If bench dogs, additional 2×4 stock will be added under the top at the dog holes to allow standard length dogs. In any case the underside will remain free of drawers and the like, not only because of bench pivoting but to allow free use of clamps along both edges to secure materials and projects.
Close-up Shots:


That’s very cool.
I’ve actually been thinking about building something very much like this in my basement shop. Mine would hinge on the long dimension, though. I know that eliminates access to a whole long side of the bench, but hey… welcome to my basement!
Very cool.
That is a pretty sweet idea.
Wow that has given me some ideas. Thank you for that set of pictures and description. Tell you what, when I get mine built I will send in pics as well.
I have no idea why this never occurred to me. I’m happy to see you are more creative than I…
As a follow up, is it possible to get a close up of the slot/pin/axle assembly?
Just to see how you handled it.
Thank you
Close-ups have been added to the article.
Thank you very much…that’s EXACTLY what I was looking for
Very nice bench design. It’s a good reminder that I still want to try and get a knock-down workbench built for apartment use.
Nifty idea.
There are a few links on the web to “folding workbenches” with a variety of styles. This is by far the most unique I have seen. The other ones I have seen are basically a small cabinet that is freestanding, the bench drops open, and the legs fold out. This is convenient in that the studs add stability that the others do not.
My only question is why not have the front legs pivot or hinge as well.
I really like the winch capability to raise and lower the bench for storage.
Jhop,
The only reason the front legs don’t pivot is that I couldn’t figure out a method that didn’t introduce instability and/or complexity (more pins, removable braces, etc). A card-table style leg wouldn’t be quite good enough. I chamfered the edges of the fixed legs to ensure that dragging/pivoting on the floor while the back end moved wouldn’t cause splintering. The real “out” for this installation is the lack of a solid wall behind the bench :-) If I need a tad more under-leg clearance the bench can be pushed a bit back past vertical and pinned in that position, or just held with a strap/rope. That puts the ends of the legs above the bottom edge of the ceiling-mounted air cleaner. A hinge or pivot wouldn’t get me any more clearance than that.
duncan
Duncan,
What a great idea. I love it. I’m currently building a 3-car and space that can easily “disappear” is great. I believe I will be building a “Murphy Bench” in the near future… First on my list though is walls. :)
Loglad,
Thanks for thinking this up and sharing! This is very sweet! I like the straight forward design of the workbech as well.
Marc,
As always thanks for providing access to each other’s ideas.
Anyone,
Are there rules of thumb for work becnch height as it relates to height? I am 6’2 is there some “typical” hegiht that I should go for? I need to build a real bench, as I learn I am finding that using the table I built as my first woodworking project is VERY Limited!
Very clever. And your wife can use it as an ironing board. :->
DD
Nice bench, but I’m really curious to know what the little wooden box on the side of your dust collector is for…
Ryan,
The box is just a duct for the collector air inlet– couldn’t have a hose sticking out into the path of the garage door/vehicles, so the box allows the hose from the trash can/cyclone to come in on the opposite side. Box is screwed to the fan/motor housing, with a rubber gasket at the collector flange. The outer flat/garage side is removable both for installation and to allow for cleaning.
duncan
Great way to use past experience to generate new ideas. Looks like it is very functional. Too bad you couldn’t modify the fixed legs so they don’t stay out though.
That’s a great addition to a small shop, Duncan. With hydraulics, you could do the same with a very hefty bench, although since it’s anchored to the wall, I’d doubt you’d need to.
I really like this idea, esp for a small shop like mine which is primarily portable equipment. If plagiarism is the sincerest form of flattery, you’re about to have a whole lot of flattery going on. I wonder if you could use a garage door opener instead of a hand pulley system… I might try that.
I bet The Schwarz is going to be beside himself with jealousy.
Nice job.
Awsome idea,that would work well for me as I have a small shed that holds woodworking materials as well as lawn equipment. Good Job!
Wonderful idea. I have a tiny one car garage that stores our rad 1998 Escort in the winter and this would really save a lot of space. Thanks for the idea!!
Add a mattress and pillow and you have a Murphy Bed. Might come in handy if the other half thinks you spend too much time in the shop!
I’ll bet the location of that power strip has worked out nice. I’m thinking of building a new bench and don’t have a clue where I can mount my strip. I guess one of the legs is the best, but I’ll have to reach under the bench to plug anything in. Oh, my aching back.
Great idea. I will be moving my workshop into a garage at a our “new” house in July and will consider building an additional bench this way.
Nice idea and good job.