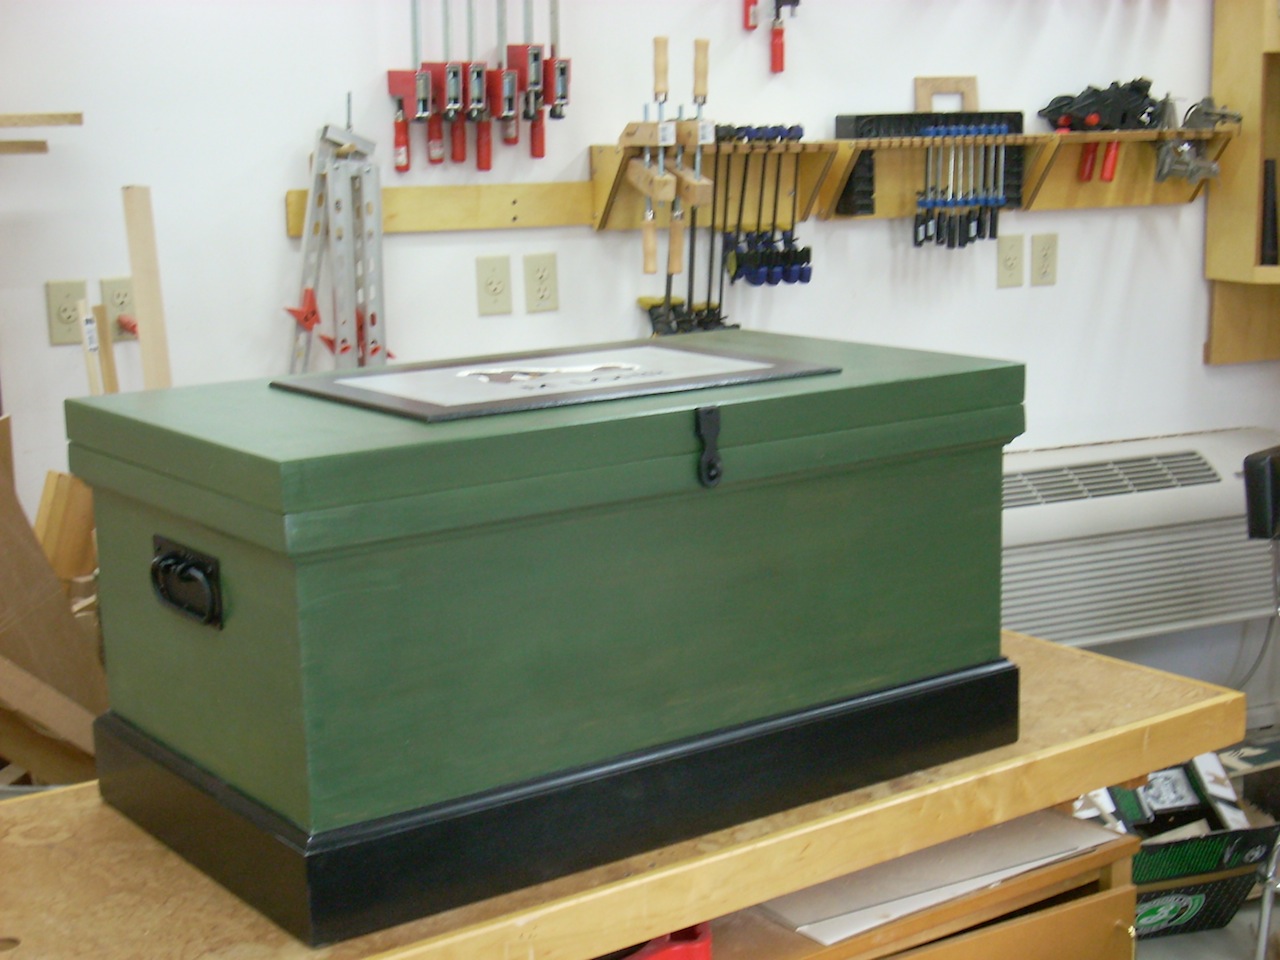
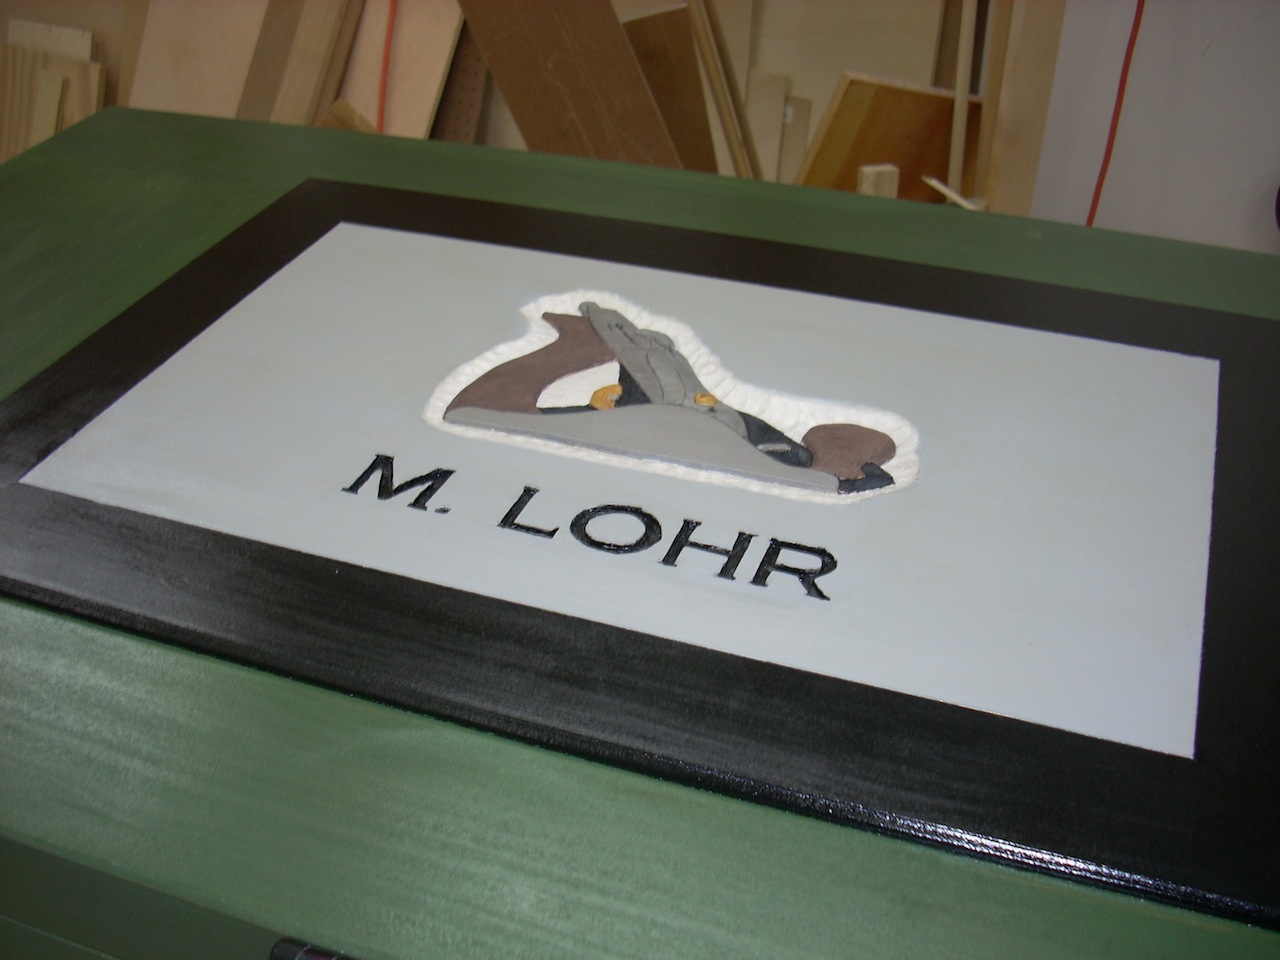
My project is a tool chest and it’s a present for my brother-in-law. He’s a pattern maker by trade and has a bunch of hand tools he uses in his job, so I hope he finds the chest useful. At his shop he has opportunities to buy used tools that retired pattern makers or other people are selling. Sometimes he has to buy whole sets of tools and if he gets a tool he already has, he’ll give it to me. He also helped me get my used lathe and scroll saw at a very good price from his shop’s repairman. So I thought I would try and make him something special by hand carving his name and the plane into the lid panel. After I got it together and painted, I noticed that I didn’t get the carving and the lettering straight and square with the rest of the case. Oh well, when you screw up carving something you can always get away with it by calling it “Folk Art”.
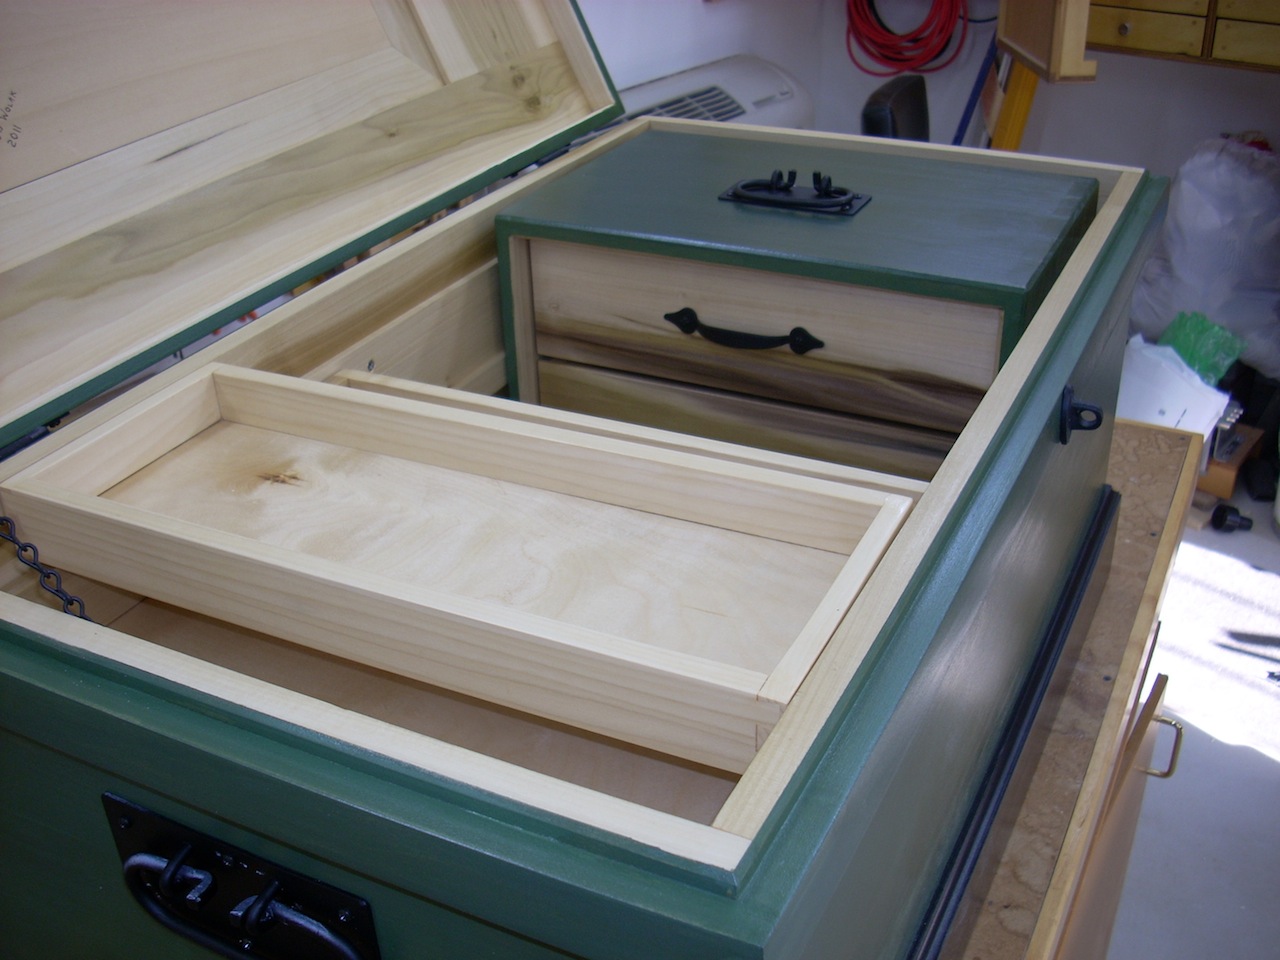
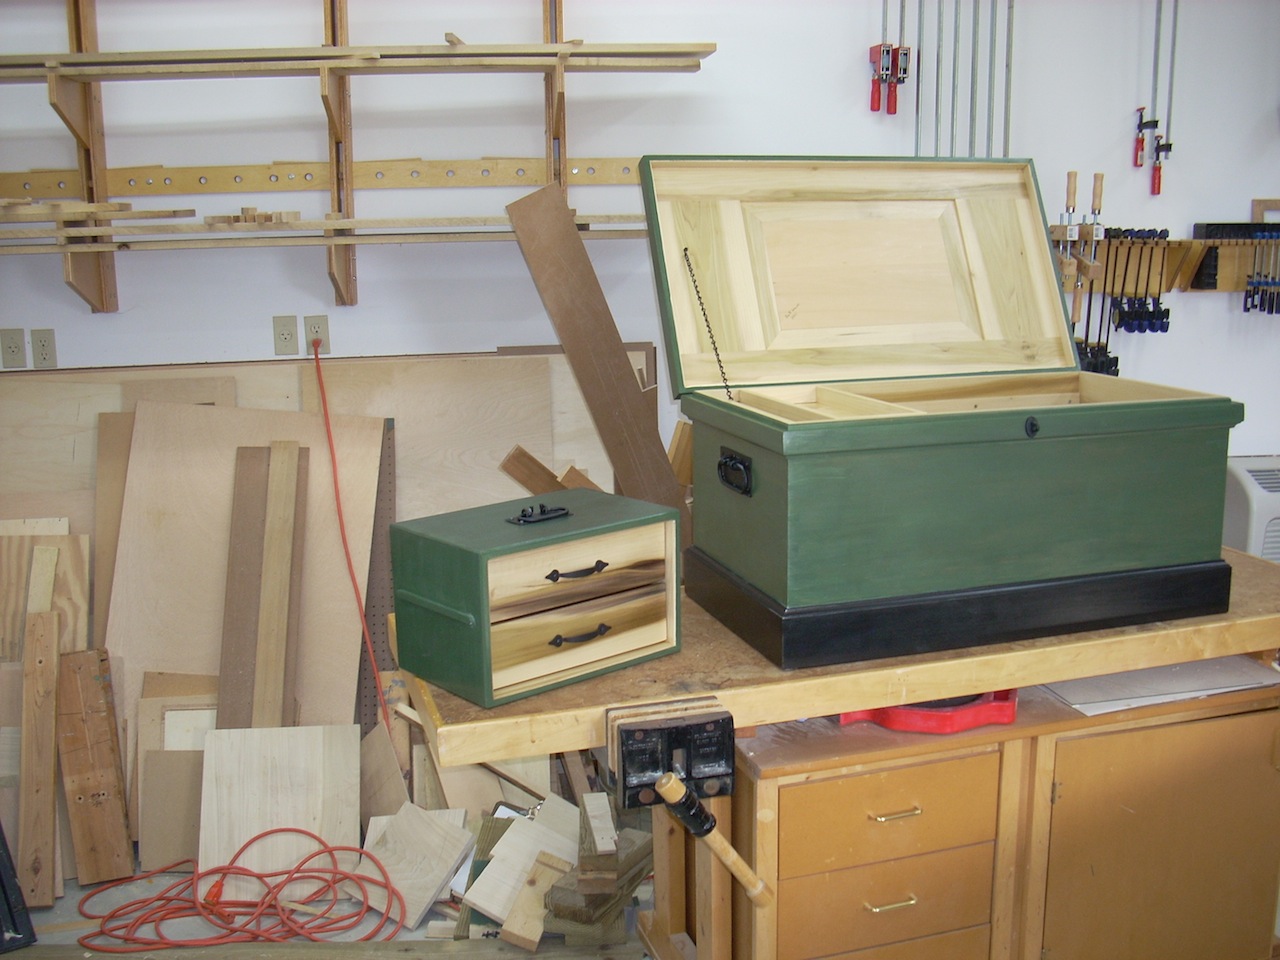
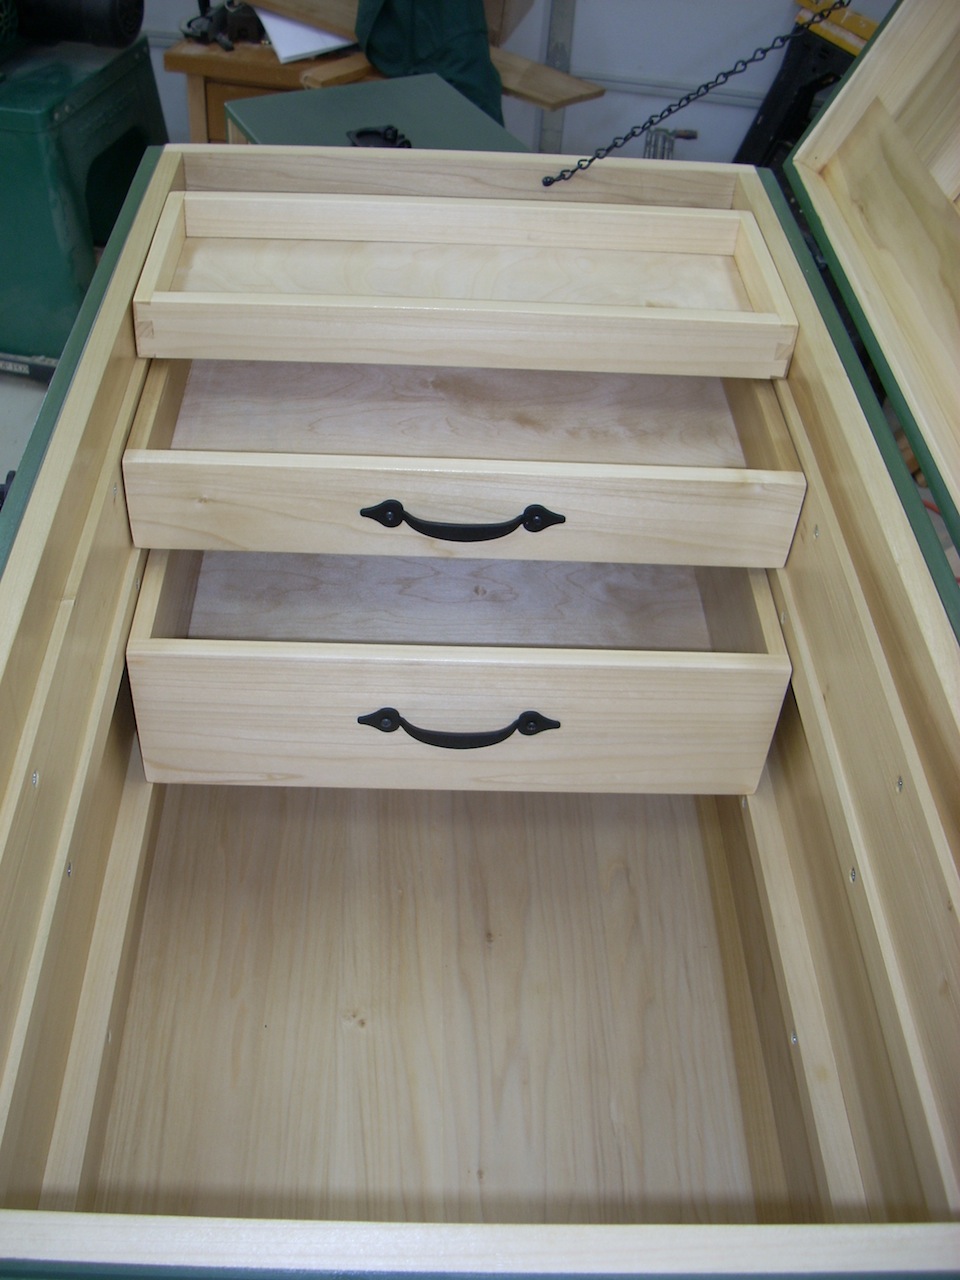
I got the plans for the tool chest from Woodsmith magazine. The case is made with through dovetails and I used my router and router jig to cut the dovetails. However, my router jig is much smaller than the case, I have the Porter-Cable 4212, 12 inch jig and the case is 16 inches high. To cut the dovetails I followed the article that was in Wood magazine. It describes how to remove the template from the jig base and attach it to some spacers so you can cut through dovetails of any length. There is also a video on their web site that shows this technique. It was a lot easier to do than I thought it would be. I didn’t spend a whole lot of time on the tool trays because I’m not sure what he’ll put in it and or how he will want it organized. I did make the small chest of drawers with the thought that he can take it out and place it on his bench for access.
I painted the case with Milk Paint to try and give it that old fashion look. I decided to paint it after I got it together and realized I didn’t do a good job in matching the wood grain when I glued up the boards to make the sides. Thanks for the web site. I really enjoy it and I’ve learned a lot from it.


Very nice tool chest. I am planning on building one this month. Could you tell me your dimensions of this chest. I have a design that I plan on using but am having a hard time deciding on dimensions. I plan to use mine for carving tools and such. Will have three or four axes, bowl adze, chisels, saws, planes, etc.
Thanks a lot.
Dave
You got a real perdy chest :-) Really well done. what color green is that? like it a lot, especially against the black. Im the same way about the imperfections, but agree with the others. Most people wont even notice, and if they do, probably wont give it much thought.
It’s a mixture of Tavern Green, Snow White, and Pitch Black from the Old Fashion Milk Paint Co. Sorry, I don’t remember what the proportions were. I just mixed small batches, with teaspoons, until I found a color I liked.
Sweet! I really like it. Thanks for posting it as it’s inspiring to see something so useful and attractive. Love the drawers and slides.
Great looking tool box and “folk art”, I mean hand carving. Your brother-in-law should enjoy it for many years to come. Thanks for sharing.
Wow
Now this is what I’m talking about. Great looking chest!
Nice job! I really like the small chest of drawers inside. Kind of reminds me of a treasure box. Open it up and there’s all kinds of stuff in lots of little places. Oh, and thanks for the tip on the dovetail jig. Don’t have one yet, but was wondering whether I would be able to do longer boards when I do get a jig someday. Love this place. :)
Your brother in law is very lucky! Beautifully designed, planed and finished. I’m in the same camp with other comments about the flaws – don’t point them out and most won’t notice. I’m typically very critical of my own work and the recipients are typically so pleased to get it they couldn’t care less.
Reminds me some of Chris Schwarz’s toolchest.
That is beautiful!
Really cool tool chest. I think the carving looks good. Every time I make a small mistake I just tell myself that its the tiny imperfections that lets people know that it was hand made. I am envious of anyone who can carve. I think it puts you on a whole other level as a woodworker. Props for a well made tool chest.
Bob, your BIL will love this chest. Really nice work, I love the interior, it’s well thought out and executed. Like others have said your to critical of your work. Keep those remarks to yourself, most people will never notice till you point it out. Thanks for sharing.
It’s a shame to cover up those hand cut dovetails, but I do understand.
All I can see when I look and my stuff is the flaws and I am always waiting for other people to point them out, and no-one ever does.
We spend so much intimate time with the piece and know it so well, inside and out, that we start to drive ourselves crazy at times.
Remember you are your greatest critic.
With all that said, your piece is incredible! Great work!
That is really nice! It is interesting how craftsmen always feel they need to point out the flaws which almost everyone else doesn’t notice.
I love the interior setup. Those sliding trays are great, and the small removable chest is brilliant. Nicely done all around!
You have made a wonderful chest for your brother-in-law. I’m sure he will treasure it.
There seems to be a lot of interest lately in this style of chest once used by journeymen
carpenters as they went from job site to job site. I have one that a friend gave me. It had been handed down in his family for years and is similar to the one you built only bigger.
Inside the lid it is written “Made by Peter Lourey Feb. 16th, 1872. Only thing saved from
the fire of 1906. By Jack Lourey”.
The fire is referring to the fire and earthquake in San Francisco, 1906.
When my friend gave it to me it was filled with tools!
Nice job. Looks like your brother in law is a lucky guy. I’m sure he’ll enjoy it for years
Awesome tool chest!!! Great storage…. Not usually a fan of painted projects, but this hits home!!! Well done…
Very nice tool chest Bob. I like the black skirt against the green case sides and top. Another thing I like are the chest lifts. Where did you get them? Also, how did you do the hand plane on top? Thank you.
The handles came from Van Dykes Restorers.
The hand plane is some clip art that I enlarged. I transferred the image to the panel by placing it over carbon paper then tracing it. Then I used knives to outline it and chisels to carve the wood away in different layers that give it the appearance of depth. They call this relief carving. I live on the Eastern Shore of Maryland and carving is pretty popular here. My wife and I belong to club that meets twice a month and we work on various projects like birds or Santa’s and stuff like that
Thanks Bob for telling me where the handles came from. I thought there was some carving going on in the hand plane. I’ve always wanted to get into relief carving so maybe I should move to the Eastern Shore of Maryland! I’m currently in Oregon.
very nice tool chest. i really like the poplar that you used for the drawers and pull out chest.
I like it. Don’t be like my auto painter friend. He used to go around the car showing me his flaws. I just said I would have never noticed them if you hadn’t pointed them out. I like that drawer idea too.
I’ll change my name to Bob D. from now on!
Great tool chest. I like the old fashion look. Nice wood grain on small drawers. I’m sure your brother in law will love it.
I have a question regarding your wood rack; how did you attached it to the wall?
The wood rack is attached to the wall with french cleats. I got the plans for it from Shop Notes Magazine, May 2007. I also think that they showed it on their TV show so there may be plans at WoodSmith Shop web site
Thanks Bob for the answer.
I really love the carving. That gives a personal touch to a piece and makes identical tool chest unique.
Great job!
That’s a nice looking chest. I especially like the pull out tool chest idea!
Looks good Bob. I like the look of the milk paint, wouldn’t have noticed the grain if you hadn’t said something.
Tell your brother in law that the lettering is very subtly italicized. :)