Bob’s Queen Anne Table
Viewer Project
-
By Bob from New Jersey
Added on January 26, 2008
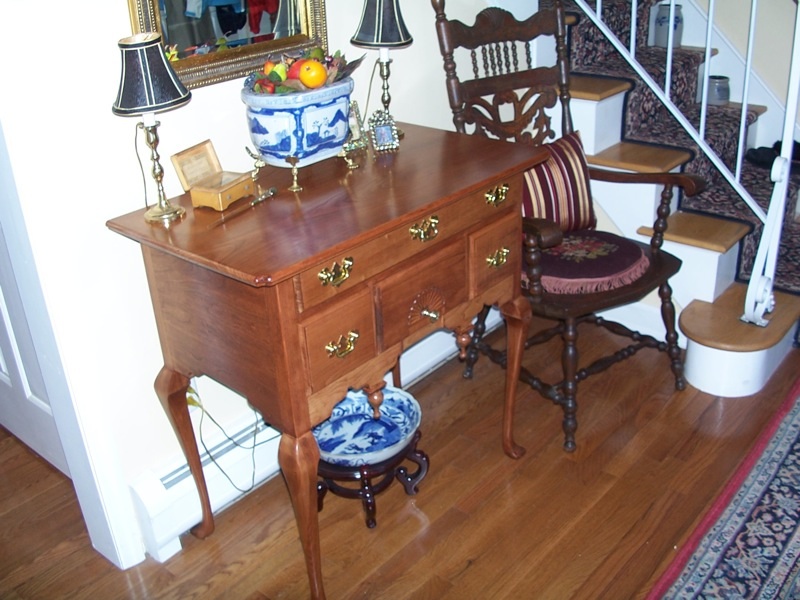
After searching for a design, I found great plans on the “New Yankee’s Workshop” site. Thanks Norm! The video and plans are wonderful. In Norm’s version, he bought the legs since they take a lot of time and are much more elaborate than shown here. After seeing the price for the legs, ($$!!), I decided to experiment and make them myself. I found plans for a simple design in Fine Woodworking and enlarged them on a copier and made a template. After gluing up 3/4″ x 3″ wide stock, cutting them on a bandsaw is very fast and easy. The blanks come off the bandsaw needing a lot of scraping, filing and sanding. Making one was easy, making four to be exact replicas was a challenge! These legs are close. The initial 4 blanks and smoothing took about 2 hours each, but then I spent an entire Saturday trying to get them as close in size as possible.
This was also my first attempt at carving which is needed for the shell design on the drawer front. The one on the table is my fourth effort after trying out the various carving tools and techniques. For this work, I borrowed a friend’s “Flexcut” chisels. Nice tools! I found it’s like other types of woorkworking. Get a plan, be willing to experiment, be patient, practice and you’ll finally get something you can use. I’ve since bought my own set of Flexcuts and am now practicing on ball and claw feet. These will take LOTS of practice if my first attempt is any indication. The mini drops were made on my lathe. Again, it took 2-3 attempts to get the design right and making two the same takes some practice but relatively simple to do.
This project took about 80 hours over the last 4 months to make. I have no idea how Norm knocks out so many fine projects so quickly! Construction is solid cherry with cut off pieces I bought as surplus “shorts” from a cabinet shop selling on ebay. Drawers are made of poplar. The legs are laminated together although the Fine Woorking plans by Lonnie Bird suggest making thick legs like this from solid stock to avoid differences in grain, color and different rates of wood shrinkage I found 3” thick cherry is about $14 bd ft which would have added $180 to the price of the project. All in all, with the plans, wood, hardware and finishing supplies, the project cost about $300.Norm’s video suggested using a Gel stain which helps smooth out the colors of the cherry. I used Minwax mahogany. Then I added 5 coats of “rub on poly” and finally a coat of Johnsons paste wax. So, in summary, the challenging parts of the projects are the legs, drops and carving, the rest is just a big box with 4 smaller boxes (the drawers) but I’m glad I tackled it.
Advertisers


