Keith’s Live Edge Trestle Table
Viewer Project
-
By Keith Tate from Overland Park, KS
Added on June 28, 2017
Total cost: Approx. $670
Hours spent: Approx. 225 (started 3/3/2017 and completed 5/5/2017 – 2 month duration)
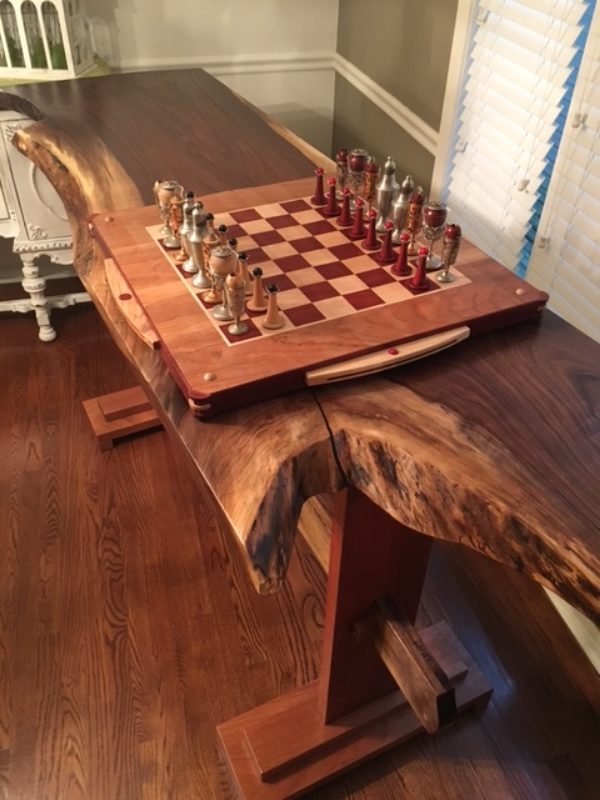
This is my first furniture build. My original intent was to a build a table for a game board I recently made. When I came across this walnut slab I knew I didn’t need something this big for that application, but I couldn’t pass up this beautiful “chunk of tree!” So after researching the possibilities of what could be done with my purchase, I decided to build a bar top table based on a trestle design.
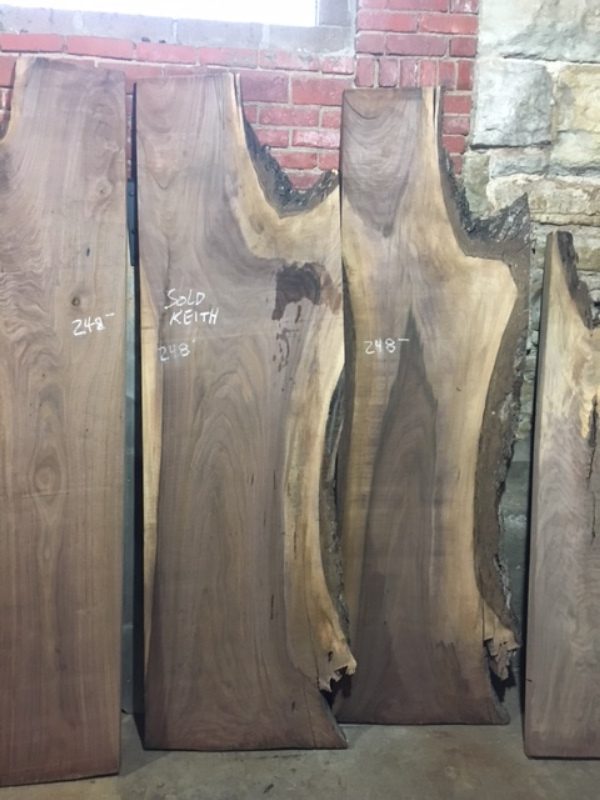
The walnut top is 8 ft. x 27 inches and has some incredible imperfect edges, with live bark attached when I purchased it. I considered leaving the bark intact, but ultimately made the decision to remove it. The revealed “live” edges were still very unique.
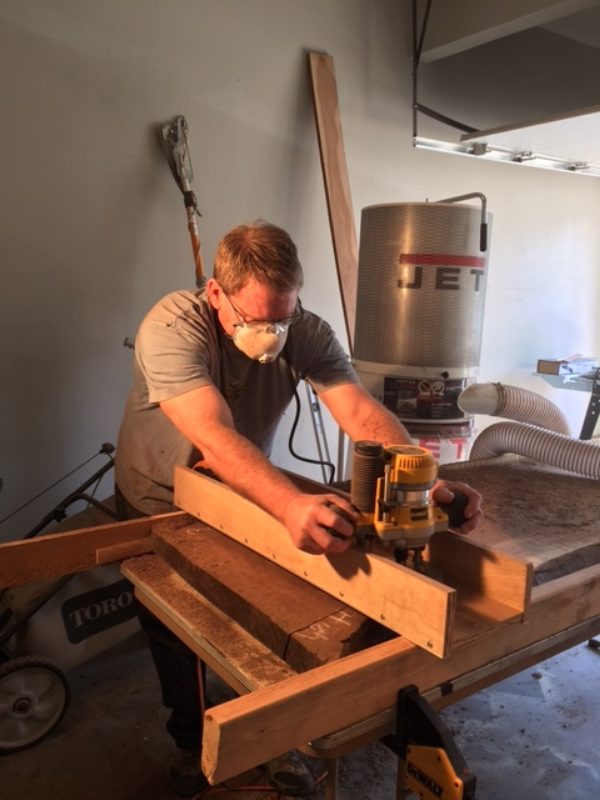
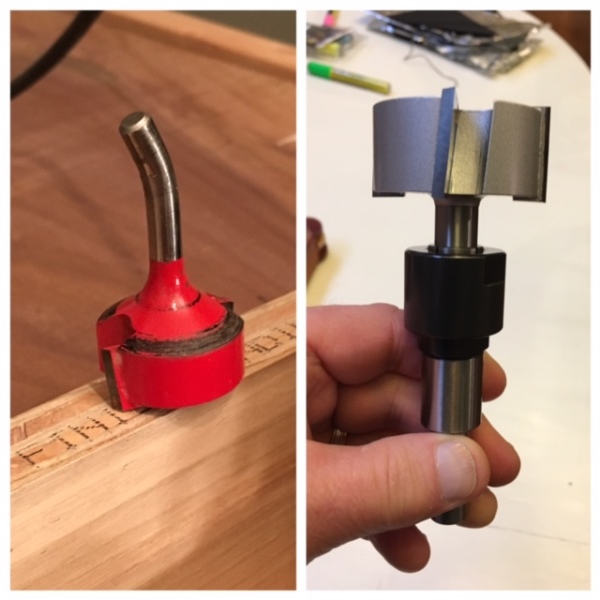
The first order of business was to clean up and flatten the slab. I pursued using the proven method of a router sled and mortising router bit to do the job. The only problem was the router bit I had used for smaller jobs was not substantial enough, and only discovered this with my first attempted pass across the slab. Immediately when the bit came in contact with the slab edge, the torque forced the bit from the router collet and it “rocketed” across my garage (see picture). Luckily no one was injured. After some research, I purchased a “monster” router bit from Infinity Tools–the Mega Dado bit–and a collet extension. This new tool did the job, cutting the top of the slab like butter. It’s the most expensive router bit I have ever purchased but was worth it.
A few substantial cracks and holes in the slab top were filled using System3 epoxy, tinted with an ebony-color powder product. I had never used card scrapers before, but I purchased a set to shave off the epoxy overflow after drying. The result is that the filled cracks now appear to be part of the walnut grain design. A very cool technique that worked perfectly.
The next step was to come up with a table base design. I chose African mahogany which provided a nice contrasting color to the dark slab top. The design of the legs and leg supports is simple, and involved mortise/tenon work, lag screws and glue for the assembly. The goal was to ensure strong functional support with a table base design that did not compete with the live edge top feature.
The defining characteristic of a trestle table is the “stretcher” that runs between the table legs to add stability. I used two walnut 1×6 boards (S4S) with very unique grain and color, glued them together to ensure strength, and shaped the ends with a curved design. The small “wedges” which act as tenons to hold the stretcher securely to each table leg are made of mahogany.
I accidentally introduced a unique design element to the leg supports which support the table top. I needed to create a subtle curved shape to the front edge of these supports so they wouldn’t protrude beyond the front leading edge of the table top (the front edge of the table top has a live edge which has a significant curve – see pictures). I successfully routed a nice curve to the edge of one of the leg supports, but when attempting to repeat this on the second support, my router template slipped and I inadvertently cut a deep gouge into the wood. Luckily I was able to turn the mistake into what I think is a cool design using sand paper and chisel so that it appears to be a planned design element. I repeated this on both leg supports. Sometimes luck yields good design (at least that’s what I tell myself).
The base is attached to the table top using hanger bolts. The course wood thread end of the bolts were screwed into the underneath side of the table top. The opposite thread on the hanger bolts attach through the leg supports using a hex nut, flat washer and lock washer. This design makes it simple to remove the legs from the table top in the event the table needs to be disassembled. The holes in the leg supports which accept the bolts were made larger than the bolt diameter to allow for expansion/contraction of the walnut slab top.
General Finishes “Arm-R-Seal!” This is an incredible product, but as with most finishes application technique is critical. I had never used the product before. I sanded all wood components to 220 grit to start, and then applied the finish to the raw wood. I lightly sanded by hand with 600 grit between coats. The table base received 4 coats and the plan for the walnut top was 6 coats. I chose the satin sheen. I initially used foam brushes to apply the finish. Applying the finish to the table base went flawlessly. It was simple to apply and the result was beautiful.
Finishing the large walnut top started just as well, but turned into a bit of a challenge. The first 4 coats were great. When I got to the 5th coat, things went south as I introduced some significant streaking (witness lines). I think the culprit was when I retraced a few brush strokes. I eventually had to re-sand with 220 grit to remove the witness lines. I didn’t attempt to re-sand to the original raw wood, but estimate I removed 2-3 of the previous coats of finish. After some research, I decided to thin the Arm-R-Seal with some mineral spirits, and abandoned my foam brushes and resorted to the cloth wipe-on application technique. This solved my problem, but the required rework was very frustrating.
I seriously considered using a pore-filling product prior to applying finish. Both walnut and mahogany are porous wood species, and I had read articles that pore-filling eliminates the risk of the open pores creating a “pitted” look after a finish is applied. After practicing the pore-filling method, I decided it was too much work and I also discovered that using a satin sheen finish will avoid the rumored “pitted” look. If your objective is to create furniture which has a very formal, glass-like finish then pore-filling might be appropriate. My application, however, didn’t call for a museum-like finish (after all…. I’m planning on spilling a few beers on top of this beautiful pub table!).
In my opinion most of the credit for creating an awesome live edge slab table goes to Mother Nature. If you can find a nice slab that has unique grain pattern and interesting live edges, that’s the “secret sauce.” Adding a good finish and basic, sturdy leg supports is challenge for the woodworker.
Advertisers


