Interested in my new Hybrid Woodworking book? Sign up and be the first to know when pre-orders are open!

Adam’s Mission Style Coffee Table

I had been interested and involved in woodworking for about a year or so, when I started making end grain cutting boards and chopping blocks. I searched the web for some videos on the topic and found The Wood Whisperer video on making an end grain cutting board. Since then I have found Marc’s website to be a very, very useful resource. The site is really setting the gold standard for educational, interactive woodworking websites.

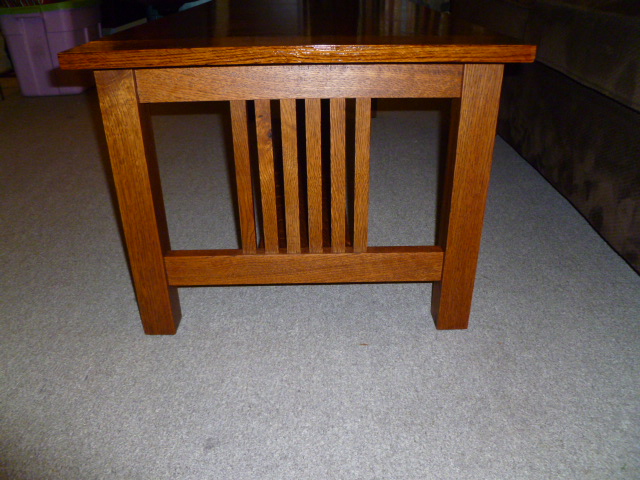
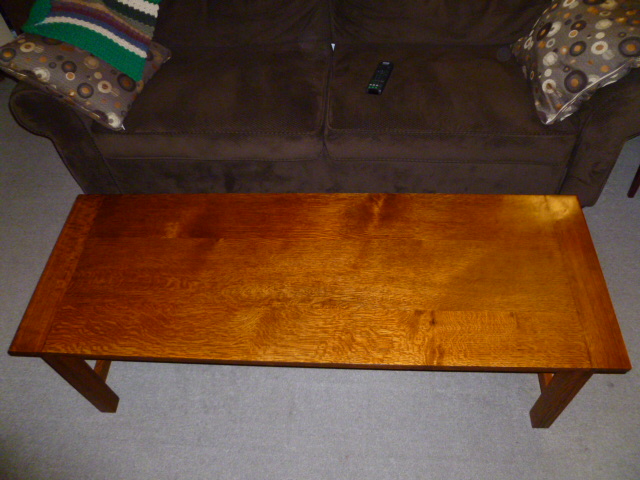
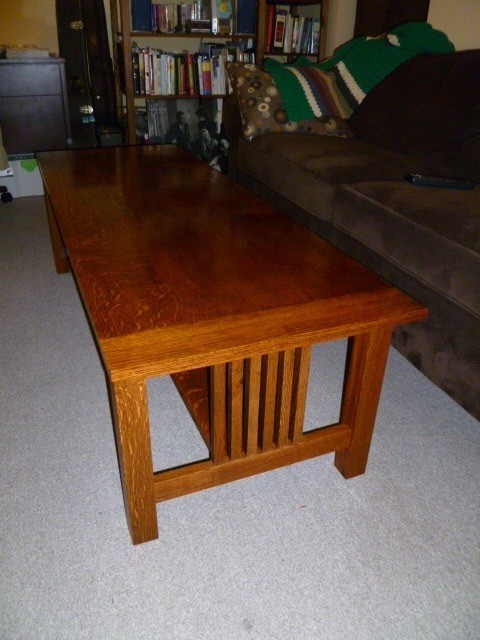
As I gained skills (and tools!), I became interested in making furniture. Last year my partner and I traveled to our family cottage which has not had a coffee table for years. So, I decided that I would make one for the cottage. I really like the mission style – the simplicity of the lines and form, with the emphasis on the wood itself.

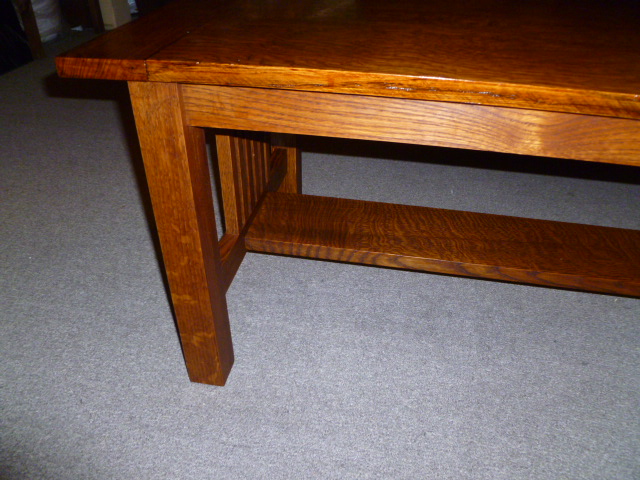
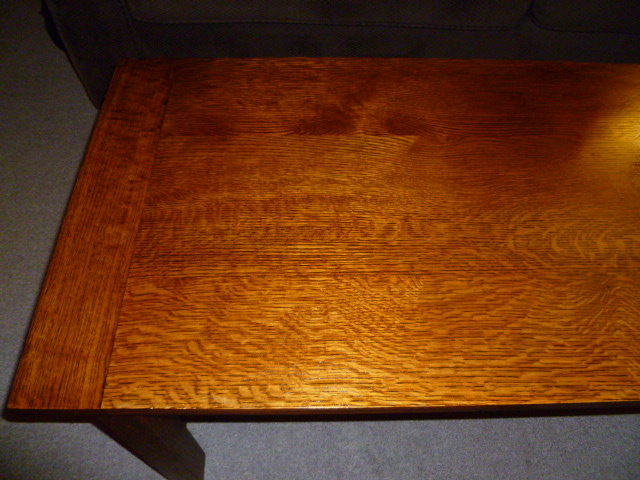
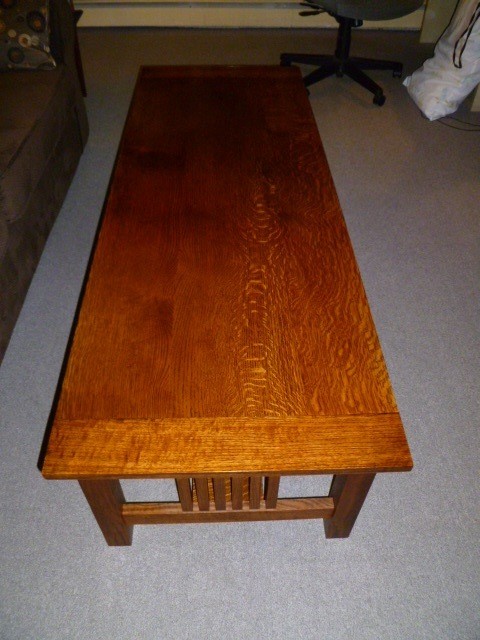
This table is made with quartersawn white oak, which I really like. The flecks and pores really appeal to me, especially with a mission style, old fashioned look. The joinery is dowels, courtesy of the Dowelmax doweling jig. I have to say that it was very easy to use and the joints appear to be plenty strong for this table. The tabletop is attached to the base via z brackets, which use screws and fit into a kerf in the table skirt.

I ran into some bumps along the way, specifically with sanding. After doing this project with a poor quality belt sander and finish sander, I decided to invest in the Festool 150 dual action sander, which I think will be a huge step up in terms of power sanding. I tried to use the belt sander with high grit (220) sandpaper to smooth out the table top, but it just left marks all over the top. I was being a little too hopeful, thinking that a belt sander would be okay in this case. I ended up sanding it all by hand, which achieved very good results, but was a LOT of work.

I wanted to make a table with breadboard ends, and again the joinery I used was dowels. There are 4 dowels in the center which are glued, then another 2 or 3 on each side of the breadboard that are glued to the table top, but not to the breadboard end. The holes in the breadboard for those dowels are actually wider, so the top can expand and contract, but is still held from vertical motion by the breadboard end. I did this by sliding the doweling jig over from the original hole and drilling another hole, then repeating until I had what looked more like a mortise with rounded ends.

I did lots of research on how to finish QSWO and came up with this process. It is a little different than most that I found, in that I applied pigment stain first, then dye. Most of what I read said to apply dye, then shellac, then pigment stain as a glaze (or something along those lines), but I did some experimentation and it seemed to work well. After sanding to 150 grit, I raised the grain and sanded to 220 grit. I applied General Finishes water based pigment stain in walnut color. After it dried, I did a light sanding with 400 grit paper. It removed some of the brown color on the flecks, but left the pores quite dark. After that, I applied a mixture of General Finishes water based dyes: Amber, Cinnamon and Medium Brown in a ratio of 2:2:1. I actually applied this twice to ensure even color, as the first coat was a little blotchy. I did not sand after this step, as I found in earlier experimentation that it removed too much of the color for my liking. I then applied 5 coats of Tried & True Varnish Oil (polymerized linseed oil mixed with pine resin). The varnish oil is applied liberally with a rag, let soak for one hour, then excess is wiped off. Cure time is 24 hours between coats. Between each application of the VO, I would simply rub (hard) with a clean cloth. The table top got an additional 2 coats of VO with a quick rub of steel wool followed by a polishing with a clean cloth.

I had immense fun with this project and learned a heck of a lot – not to mention a table I am quite proud of!

Comments

  1. Phil Collins May 5, 2013

    Very cool coffee table chap, design and coloring is awesome, well thought out and well put together,
    Regards
    Phil
    Newmarket, ontario,Canada
    GO LEAFS GO

  2. Daniel March 3, 2013

    Great table! I realize this is your own personal project, but is there any where to get the plans for it. I’m a beginning woodworker and interested in building something like this!

  3. Robert January 15, 2013

    Adam, I’ve always liked the mission style furniture and what you’re building is outstanding.
    Thanks for letting all of us see your work.

  4. Mark December 8, 2012

    Wow. I just finished my first year of woodworking and haven’t made anything this nice. I was on here looking for ideas for coffee tables. Thanks for the inspiration, I like the breadboard ends.

  5. Dana Caffrey November 28, 2012

    Looks wow! The coffee table is now a classic and elegant design. For sure this will be used for used in many years. Great job you have there!

  6. Sanding at times can prove to be a challenge with this furniture, but you did great! And the technique of putting coat wax worked like a charm.

  7. Seth Hoover September 25, 2012

    Looks great! That QSWO is amazing!

    Got me thinking…I have an Ashley recliner and a futon in my living room with mission style sides. My coffee table though is a particle board piece of junk I got when a friend in college moved to a smaller apartment.

    Time to replace my coffee table with something like yours!

    Great job!

    • Adam Rizzuto September 25, 2012

      Ugghhh….particleboard……!

  8. Byrdie September 23, 2012

    If this showed up in a Frank Loyd Wright home no one would have any idea that it’s not contemporary. Beautifully designed, well executed and finished. I would be pleased to have this in my home or cottage. I’m sure you are too.

    • Adam Rizzuto September 25, 2012

      Funny enough, about a month ago my wife and I went to see the Frank Lloyd Designed homes Falling Water and Kentuck Knob! It was kind of a pilgrimage we had wanted to do for a long time, and it was amazing. There was also some beautiful woodworking in both homes in addition to the architecture.

  9. Bob September 23, 2012

    I really like the grain pattern and you exposed it very well. It ‘s a nice looking table.

  10. paul anderson September 21, 2012

    Nice work very good looking coffee table. Be proud!

  11. Joel September 21, 2012

    Great coffee table that will last a lifetime.

    • Adam September 22, 2012

      I hope my grandkids will one day use this table.

  12. Dean September 21, 2012

    I really like Mission style and Arts & Crafts furniture. I also like quarter-sawn white oak. You did a great job on the table. Also, thanks for sharing your finishing schedule. There are so many posts on the web, and in books, as to how to best finish QSWO, that it can make choosing a method very difficult.

    • Adam September 22, 2012

      Yeah, I find it can be a little mind-boggling, but as long as you settle on something and stick to it, you can’t really go wrong, I think.

  13. Brian September 21, 2012

    This is a great looking coffee table. You will have a lot of use of it for many years. Also it is such a classic design, almost a timeless one.

  14. Mike_M September 21, 2012

    Excellent joinery. Nice grain matching and the finish is very nice. Great Job!

  15. Sean O September 21, 2012

    I also love quartersawn white oak. Some people really like the modular rays others don”t. I really dig the way it looks. The design is cool I’m a fan of the breadboards. I’m curious about the orientation of the boards for the tabletop. I think this project could have been elevated even higher if the top had been book matched.All in all very cool. I am starting a project pretty soon here and I was trying to decide between attempting mortise and tenon joints for the first time or to use dowels. I decided to do mortise and tenon mostly because I don’t want to shell out the cash for a quality dowel jig when I can cut the tenons with my dado stack and cut the mortises with my router.

    • Adam September 22, 2012

      Thanks for all of your compiments, folks. It was a lot of fun making the table. I have also put a coat of wax (Clapham’s Beeswax polish) on since making the table, mainly to experiment and see how it affected the finish. I’m not sure if it made a huge difference, but I think over time as the table gets knicks and marks, numerous coats of wax will add to the whole “patina” aspect of old furniture that many people (myself included) find appealing. As for the orientation of the boards in the tabletop, I purposefully went with three different boards of varying, random widths, and just oriented them to best highlight the grain, etc. I went with the different widths to emphasize more of an old-world, country look. That’s also why I included the breadboard ends.

  16. daniel drabek September 21, 2012

    Excellent job. I love quarter sawn oak. It inspires me to do my best with such beautiful material. I very much like your stain. The color is rich and appropriate for the piece. While they didn’t have coffee tables in the arts & crafts period, this piece would fit right in visually. It should give many decades of good service.

    DD

  17. Texfire September 21, 2012

    Very nicely done. I’m thinking of making something similar.

  18. That coffee table is beautiful. I love the color and the design. My upcoming project will be done with dowel joinery (kid’s table and chairs) and then a coffee table is next in line. The coffee table will have some of the same elements as yours so I am glad to hear dowels worked well for you.

    Well done sir!

  19. Patrick Schupbach September 21, 2012

    Very nice work!!! You should be proud of your work…. I love the grain in that QSWO.

Leave a reply

XHTML: You can use these tags: <a href="" title=""> <abbr title=""> <acronym title=""> <b> <blockquote cite=""> <cite> <code> <del datetime=""> <em> <i> <q cite=""> <strike> <strong>

*

Online project based woodworking education.

3 Membership types

  • A la Carte
    Starting at $25/project
  • Subscription
    $129/year
  • Superfan Subscription
    $299/year
Learn more →

Simple Varnish Finish DVD

Coming Up


  • There are no upcoming events

  • Turning the Post Pt. 2

    May 24, 2013
  • The Router Jig and Dovetail Slots

    May 31, 2013
  • The Legs

    June 7, 2013
  • The Top & Pivot Block

    June 14, 2013
clearvue-200x200
TWW_v6_200x200

Pressure Treated Wood Utility Poles for building structures, distribution or transmission.

bellforest200x200-tww10