80 – Nicole’s Picture Frame

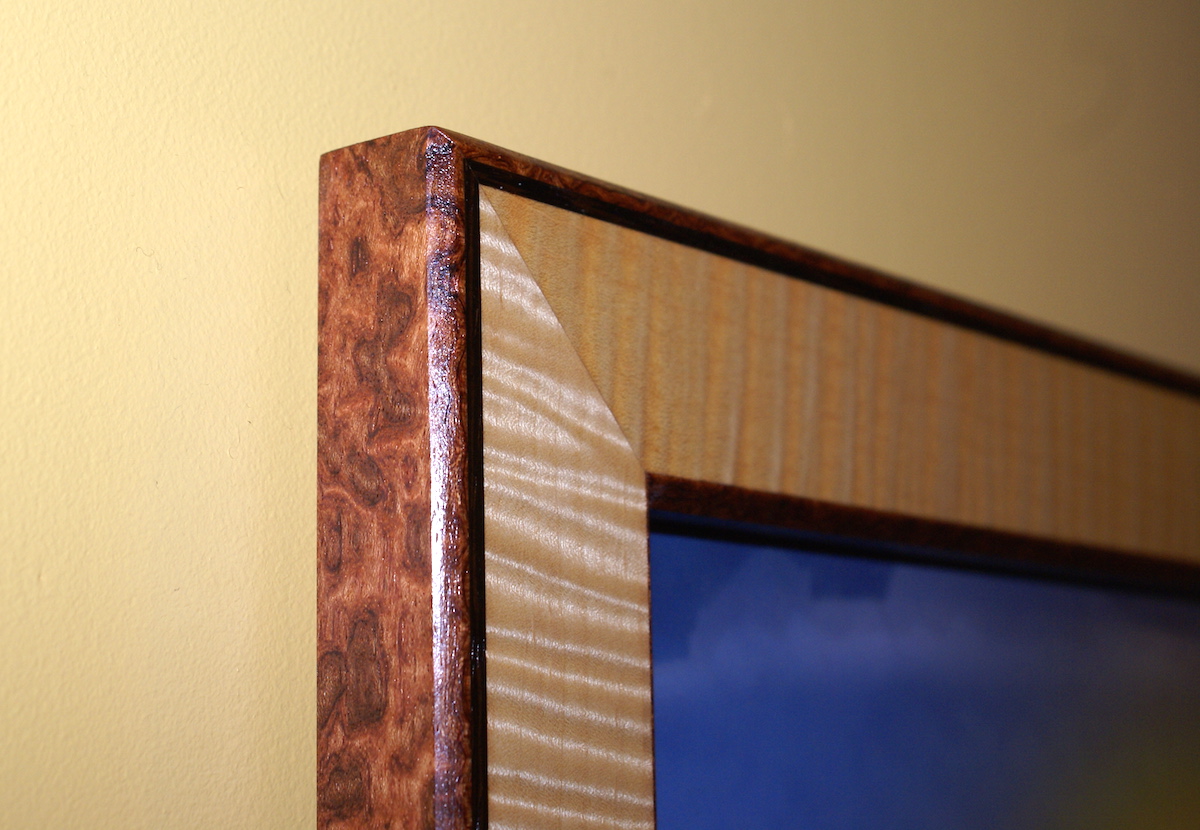
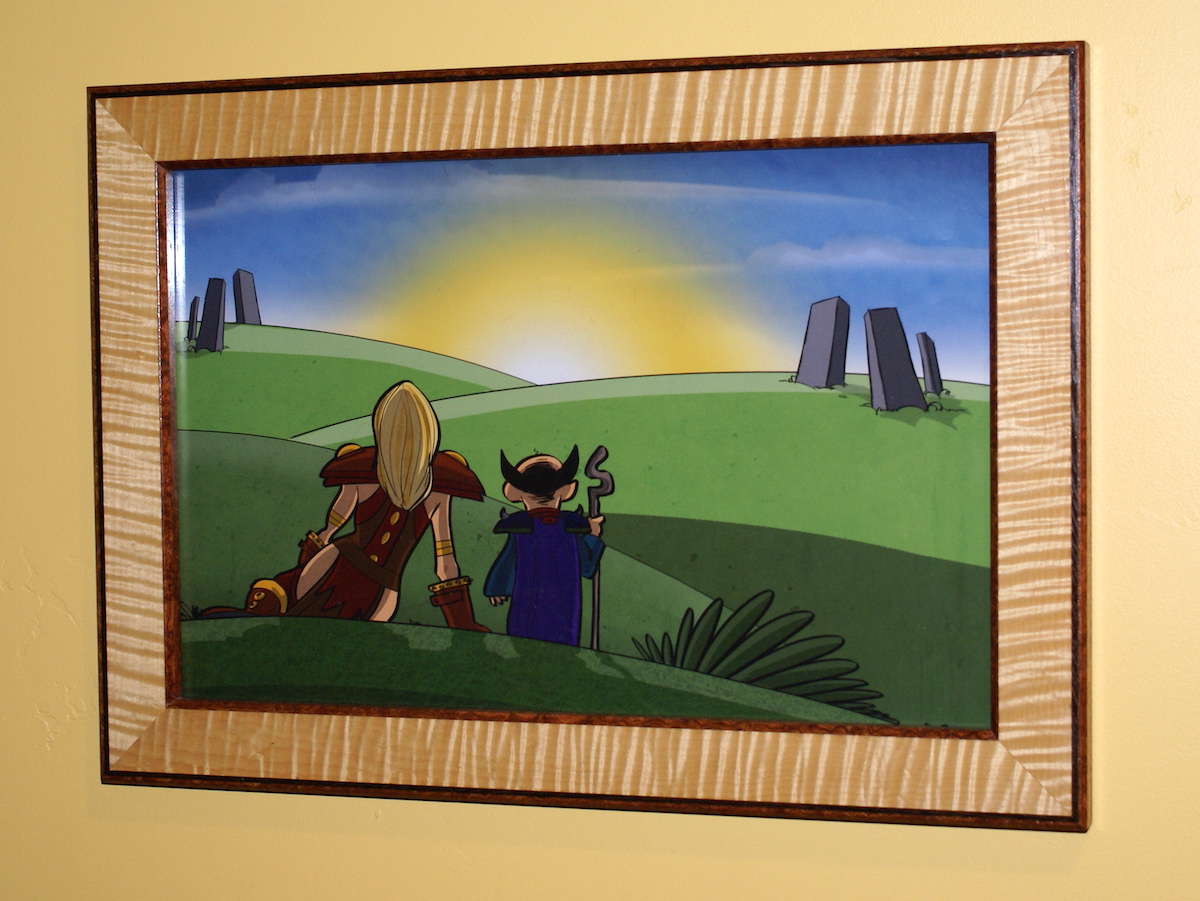
About 4 days before Christmas, I started making a nice little picture frame for a custom piece of art I had made up for Nicole. A gift for a special girl requires some special wood. So I pulled out my best sheets of curly maple veneer and a couple of sheets of home-sawn afzelia wood (thanks for link Logan!) that I received from David Marks. You may find it odd that I decided to use solid maple as the substrate for the frame. I thought this would be a fun experiment, and when the rabbets are cut in the back, there won’t be any unsightly ply to look at (not that it matters that much). Small projects like this are just a great place to experiment with techniques and materials you might not normally use. All the extra effort pays off in the end when the finish hits the wood. KABLAM!!!! The wood just comes to life!

And here are a few still shots of the frame. Its on a yellow wall which isn’t exactly the best background. Some day I will take it down and get some really nice shots.

frame2 frame1

I didn’t really cover the finishing method in depth, but its the same wiping varnish system I always use. Specifically, its the one outlined in my DVD, A Simple Varnish Finish.
A very special frame for a very special girl! I show you how to use solid wood as a substrate for veneer. A very special frame for a very special girl! I show you how to use solid wood as a substrate for veneer.

Category: Projects

Comments

  1. Ben H February 8, 2009

    Nice man……as always.

  2. Logan McMinn February 8, 2009

    I’ll bet this is what you have:

    http://en.wikipedia.org/wiki/Afzelia_xylocarpa

  3. Chris (http://tool-rank.com) February 8, 2009

    Very nice. Can you post a picture of the finished frame with picture, you didn’t have one in the video… unless I just missed it? :)

  4. Sunshine Gerl February 8, 2009

    Very nice Marc!!! I really like how you made this picture frame simply beautiful!!! You sure made those miters look easy with that Domino tool. What size were those dominoes for those miters? Thanks for the video. Fun as usual!!!

  5. John C February 8, 2009

    It takes a big man to admit he’s a gnome. : )

    Great works as always. The figured maple is beautiful.

  6. Ben Wilson February 8, 2009

    Marc – nice frame, I was telling my wife how great you are in the shop and how I watch all the vids / read all the posts & then you bust out a WOW pic! WHAT, whats next – a 12 sided wooded dice? I didn’t see that one coming. Maybe from Matt, but not you. Later

    Ben

  7. Germain February 8, 2009

    I really like the message of the art. “Hot, medieval blondes dig short, middle-aged balding guys”. ;-)

  8. Germain February 8, 2009

    Say, Marc. Why did you use plexiglass instead of glass? Is plexiglass actually better for this application?

    •  

      Better? Not necessarily. The plexiglass is lighter and I honestly have a hard time telling the good stuff apart from glass when used in a picture.

      But my real reason in this case was the fact that it was three days before Christmas and I can cut my own plexiglass. :) Oh, it is lighter too so that might be a concern in some applications.

  9. Gary Bell February 8, 2009

    Marc Really Nice!
    Very Artistic and good craftmanship. I noticed that you did not use a miter jig and yet apparently your joints were right on. Would you attribute the accuracy of your 45 degree cuts to your use of the Festool chop saw? The domino was really slick too. Enjoyed your video very much.
    Thanks

    •  

      Well, the Kapex is one of, if not the most accurate saw on the market. But that doesn’t mean you can’t tune up other saws to give similar results. I know my old Makita would have produced similarly tight joints. Obviously there are some models out there that aren’t as good at holding calibration, but most decent saws can yield nearly perfect cuts with just a little bit of calibration TLC.

      Clamping the workpiece goes a long way when cutting miters too.

  10. Luke February 9, 2009

    Just a comment about framing. I like to matt my art. In my case it is photography I do. This may not be as critical for yours because I am not sure what it is printed on, but a photograph and the frame glass tend to really like each other over time. A photograph can stick itself to the glass and will never come off. By using a matt, not only can you emphasize the frame and the art, but it also keeps the art way from the glass and thus prevent it from sticking to the glass. Also I like to use UV resistant glass. This is especially handy if your art will see the passing sunbeam day in and day out for years. Great frame and next time you are at a frame shop, price what that would have cost you. You will may be surprised. Custom nice frames are super expensive!!

  11. David February 10, 2009

    Who makes the straight edge you used while cutting the veneer?

  12. Brian February 11, 2009

    Marc, that was a beautiful frame. Thanks for the video, I really enjoyed it. I have one question though. When you clamped the frame diagonally to bring it square, which corners did you clamp? Could you elaborate a little more on this?
    Thanks, and keep up the good work :)

    Brian

    •  

      Thanks Brian. The easiest way to understand that process is to draw a parallelogram on a piece of paper. Imagine what would happen to that parallelogram if you squeeze from one corner to the other. If you can’t visualize it, I’ll attempt to explain in words. The corners that I am applying pressure will both open up a bit. So if I have two corners that are at 87 degrees, and the other two corners should then be at 93 degrees. The correction is made by applying clamping pressure on the 87 degree corners. The pressure opens them up and increases their angle (but decreases the angle of the other corners).

      Clear as mud? I will definitely cover this in more detail on a show in the future.

      • Brian February 11, 2009

        Thanks for the info, Marc. As soon as I read “parallelogram” the little light bulb lit up. Could you actually see a gap in the miters, or were they so small that only the tape measurer revealed them?

        •  

          Actually at that point, there is pretty much no detectable gap in the miters. The only way I spotted the issue was to use my square. And I try to use the biggest square possible in order to exaggerate the error.

  13. Gordon February 11, 2009

    Marc,
    Thanks for the very timely post…I was planning on framing some photos for Valentines Day for the missus but didn’t think to make my own frame. After seeing your post, I went out and bought some curly maple and leopard wood, unfortunately they didn’t have any Afzelia on hand. I look forward to moving this to the top of the queue, my father-in-law can wait a little longer for his Christmas present to get done!

  14. arjan February 13, 2009

    Another good use for the domino. But it is essential the holes are in exactly the right place. Do you mark it with a pencil as you would do with a biscuit or do you make one hole larger than the other so you can shift for perfection. How do you do that?

    btw, nothing says I love you better than using that special piece of wood right?

  15. Stephen February 13, 2009

    Thanks Marc, once again you make a process that has left me a little daunted much clearer.
    Very nice frame by the way.
    An other thing I really enjoy is your choices of woods and veneers. The contrasting colors and shades have opened my eyes to more possibilities in my own projects.

  16. Brian February 28, 2009

    Marc,

    That was AWESOME! I waws a huge fan when you first came out, then switched gears and was unable to follow for a while. I recently dusted off all my Festool’s and thought I would catch up on your podcast. Then, to find out that you and Nicole play WoW… Well, I was astonished. My wife and I also play and consider it some of the funnest family time that we have together.

    Anyway, keep up the good work.

  17. Matt March 24, 2009

    I’m in awe of this frame but extremely confused… it looks as though you only glued up two separate pieces of wood, did those two pieces get cut into 4 or were there two other pieces that didn’t get filmed?

  18. Marc,

    As a certified picture framer, I have a few pointers for you.

    Placing the artwork directly against the glazing is not a good idea. Either the artwork could stick to the glazing due to moisture, or the pigment of the artwork (particularly pastels) will be drawn off the paper to the plastic due to static electricity. It is generally preferable to space the glazing at least 1/8 inch off the artwork.

    Using plywood for a backing board will cause the paper to become acid burned in due time. The acids in the lignins in wood will degrade paper artwork. It is preferable to use an acid free backing board – either mounting board or paper faced foamboard. Also, the acid in the frame itself can migrate to the artwork, so either the rabbet should be lined with a metalized tape, or acid free matting should be used to space the edges of the artwork at least an inch away from the inside edge of the frame.

    Apply a dustcover to the back of the frame. The best dustcovering material in my opinion is Tyvek. It is strong and provides a barrier against moisture and airborne pollutants.

    You built a beautiful frame, but it isn’t doing justice to the artwork the way everything is assembled.

  19. Steven March 10, 2010

    Marc,

    I think I missed it, but what was the height set at for the Dado blade? Is there a standard for frames considering the glass that is used for the frame?

    Still learning this whole woodworking trade. Love the videos.

    •  
      thewoodwhisperer March 10, 2010

      Hey Steven. I think I went 1/4″ on mine. But it really depends on what you are putting in the frame. You need to account for the artwork, glass, any matting, and the backer board. So its a good idea to make it fit perfectly for each particular piece you make. I am not 100% if there is a standard and what that would be. Best way to find out? Bring a ruler to the craft store. :)

  20. Jesse August 4, 2010

    Hey Marc. Love your videos. Its my go-to website for new ideas for small projects to do around the house =)
    One quick question though. I noticed you used the “clips from Rockler” to hold the backer board in place, could you be more specific?
    Or would could you recommend another way to hold in the backer board? I tried glazing points, but the frames I have made are really HARDwoods (Ipe and Cumaroo) and well those points bend under the pressure like Superman against a rebar, if you know what I mean. Any ideas? Thanks alot in advance.
    Keep them videos coming.=)

  21. Bryan V June 30, 2011

    That is a very nice looking frame, I saw you had this video when i was looking into making a picture frame. It really helps, thanks you!

  22. Dave July 6, 2011

    Hi Marc,

    Great looking picture frame. I woulds like to make something similar for some pictures we recently purchased. Since you divided the boards the finished product is only laminated on one face. Have you had any issues with the rails and stiles cupping or warping?

    Thanks,
    Dave

  23. Dan July 16, 2011

    I would be REALLY interested in a Wood Whisperer tutorial on the Domino. In lieu of that, could you describe in a bit more detail how you did the marking out for these Dominos, how you kept the Domino accurate when holding it freehand etc? I can see you have the wood clamped but otherwise you’re just using your eyes and hands?

    •  

      Hey Dan. There really isn’t much more to the process than what you saw in the video. Mark a line across the joint, set the height do that you’re centered along the thickness of the workpieces, set it in place, and plunge. I am indeed lining up the Domino by eye with the workpiece clamped securely. In this way, the Domino is a lot like a biscuit joiner. The setup really doesn’t need to be any fancier than that.

  24. Steven Reckner January 6, 2012

    I am only a few years into woodworking and really wanted to make some nice picture frames for some pictures i had been holding onto for over 10 years, this video was awesome i just never realized that a lot of awesome wood could be an amazing veneer instead of a solid piece! I know for most this was obvious but to a newbie this was a religious experience thanks mark for an awesome video!

  25. Jeremy Scuteri March 21, 2012

    What grit sandpaper are you using on the drum sander when you run the home sawn veneer through it? Are you just cleaning up the bandsaw marks or are you getting it to a desired thickness as well? How much do you take off with each pass?

    •  

      Hi Jeremy. It is hard to estimate how much I’m taking off per pass. It depends on the grit, the wood, and the speed. But generally speaking I try to take off very very small amounts. If you get burning, that’s a good indicator that you are trying to take off too much or you are running the conveyer too fast. As for the grit, I use 120 primarily. So if the bandsaw cut is pretty rough I might start with 120. If I need the veneers to be a little thinner, I just take a few more passes with the 120 grit. Depending on my mood and how lazy I am that day, I might also throw on some 180 grit to do some extra cleanup and save me some sanding time after the veneering work is done.

  26. Lee April 5, 2012

    Great video, as always. I’ve been looking around your website for a while and it’s incredibly helpful. I started off with the end grain cutting board (who didn’t?) as a wedding present, and it was very well received. We burned their names and the date of the wedding into the bottom of it, which turned out great for my first wood burning experience. I’ve been thinking about making a picture frame as a wedding present for another couple, so naturally I checked to see if you had any picture frame projects, and I have a couple questions.

    Is there any particular reason that you used the curly maple veneer instead of just using curly maple lumber? I really like the look of curly maple, and I have some left over from another project, so I’m thinking about just using that for a frame with some kind of a trim. Will that end up looking as nice as the veneer in yours?

    Also, I watched your “pop goes the maple” video when I was working on my previous curly maple project, and in that video you use a dye and shellac before using the varnish. Do you think that the dye treatment would have benefited (or perhaps harmed) this frame?

    Finally, do you have any other recommendations for woodworking wedding gifts? I have a Sketchup drawing all ready to go for a jewelry box that I think will be awesome, but that’s really a gift for the bride, not the couple. I figure a married woodworker would have to have some ideas for this.

    Thanks a lot.

    •  

      Making wood gifts for people has to be one of the most gratifying parts of this craft. Glad you were able to do that with your boards.

      As for the curly maple, the basic idea here was to conserve high quality wood. So I wanted to show how you could use cheap solid wood and give it the look of a more expensive figured wood. You could certainly use solid curly maple if you wanted to. If the maple has a lot of curl, it should be indistinguishable from mine.

      Concerning the dye, it would have indeed increased the visual intensity of the grain. Would that be a benefit? Well that depends on who’s looking at it. In my opinion, it would not have make the frame any more “beautiful”. But that’s going to vary from person to person and project to project.

      And while anything small and simple makes a good gift, I can’t say I know what would make a good wedding gift. Really, anything that you can somehow attach the concept of romance or perhaps adorn with the date would fit the bill. Nicole would punch me for not thinking more “romantically” about this. :)

Leave a reply

XHTML: You can use these tags: <a href="" title=""> <abbr title=""> <acronym title=""> <b> <blockquote cite=""> <cite> <code> <del datetime=""> <em> <i> <q cite=""> <strike> <strong>

Coming Up


  • There are no upcoming events

  • Video: Flattening a Benchtop With a Router

    May 23, 2012
  • Wood Talk Online Radio

    May 23, 2012 - 5:00 pm MT
  • Adirondack Chair Class (William Ng School)

    June 4, 2012
  • Video: Turning a Tool Handle

    June 6, 2012
  • Woodworking in America (Pasadena)

    October 12, 2012

Live Shop Cams


Enter the live room →

Pressure Treated Wood Utility Poles for building structures, distribution or transmission.

Cliq Studios sell quality Kitchen Cabinets in a range of woods including cherry, oak and maple.


what wa